Instructions and Videos
BbTalkin Instructions video page is here to support you. Find your instruction video here to connect or pair in 2p, 3p settings. Instructions about mounting the intercom you can also find here.
Download PDF Instructions for BB Talkin Devices
Instruction how to mount B02R and B03R helmet pads to a helmet

Before sticking the S08 velcro mount to the helmet. Use the alcohol pad to clean the surface. Scratched surface is not a problem but will affect durability of the sticker attached.
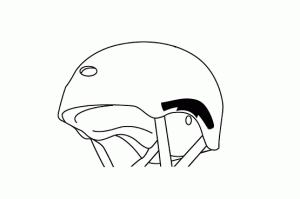
Place the S08 velcro tape right above the ear.
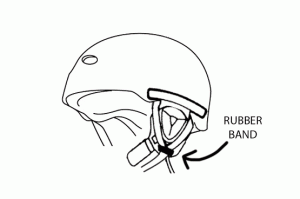
When placing the B02R or B03R earpads. Make sure you loop the chin buckle thru the elastic rubber band. This prevents you from loosing the earpad when crashing hard and keeps them firmly in position close to the ear.
We recommend to let the sticker dry overnight.
Instruction how to mount the S06 or S06R mount to a helmet

Before sticking the S06 helmet mount or S06R rubber helmet mount to any surface. Use the alcohol pad to clean the surface. Scratched surface is not a problem but will affect durability of the sticker attached.
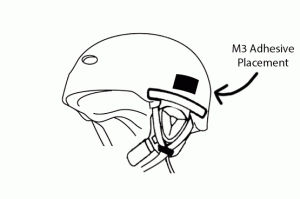
This is where the intercom should be placed. It important to place the S06 or S06R mount right above the earpad. Otherwise your cable will be too short.
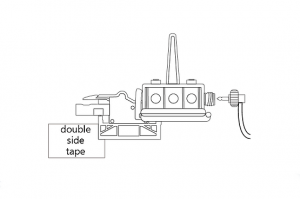
Place the the waterproof case in the S06 or S06R helmet mout. Peel off the white side of the M3 adhesive and stick on the back side of the S06 or S06R mount and press firmly. Then peel off the red side of the M3 adhesive and place the intercom where it should go and press firmly.
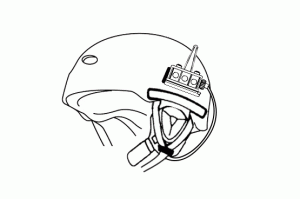
This is the end result for the helmet with intercom placed on the right spot, jus’t above the earpad.
We recommend to let the adhesive dry overnight.
Instruction how to mount the intercom to the Hat, Cap, Armband or Goggles
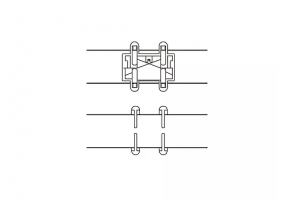
Use the special mount for straps. Make sure all 4 pins are behind the elastic band or fabric. The Hat (B01HR) and Cap (Bo1CR) have extra fabric on the left side of the head. The sportsheadset (B01R) comes with a separate S05 armband for attaching the mount and intercom to the arm.
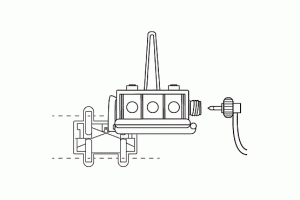
This is the right setup for strap mount. The strap mount is attached to the fabric. To add the intercom to the mount. Hold both pins in the right place and push down until you hear a click.
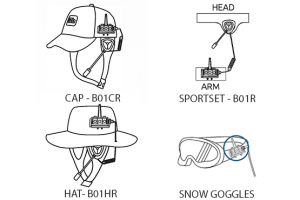
The end result should ook like this. The intercom antenna pointing upward. And the Advance attached to the left side of the user.
BbTalkin Advance: Video about basic functions and resetting
In this BbTalkin video we show you how you use the buttons and functions on the advance BbTalkin intercom. In this tutorial you will get to know all functions and buttons on the device.
In this BbTalkin video tutorial we show you how to reset the device to factory settings. This will erase all already paired devices.
BbTalkin Advance: Video about 2p pairing and reconnecting
In this BbTalkin video tutorial we show you how to pair two Advance intercoms. Left menu showing the steps to take.
In this video tutorial we show you how to reconnect already paired (2-way setting) intercoms. It’s important to use the same intercoms after you paired once.
BbTalkin Advance: Video about 3p pairing and reconnecting
In this BbTalkin video tutorial we show you how to pair three Advance intercoms. In this setting you use one intercom as instructor/master device. Nr.01 and No.2 intercom are for you students. This setting is often used for instructors who have two students and want to be in control of all connections. This a common setup for Kitesurfing, Windsurfing, Wakeboarding, Flyboarding with 2 students.
In this BbTalkin video tutorial we show you how to reconnect already paired (3-way setting) intercoms. In this option it’s possible to be in control as an instructor for all devices. You are able to connect and disconnect. This setting is used by instructors that need to mute the device. It’s important to use the same intercoms after you paired once. And make sure you tag the instructors intercom. (in this case on no number/blanc)
In this BbTalkin video tutorial we show you how to pair three Advance intercoms. In this setting you use intercoms and link them from one to the other. No.01 to No.2 and No.3. Adding more is possible (up to 6 intercoms in one chain). This setting is often used for normal linking.
